ASP.NET Core Authentication in a Load Balanced Environment with HAProxy and Redis
Related Posts
Token based authentication is a fairly common way of authenticating a user for an HTTP application. ASP.NET and its frameworks had support for implementing this out of the box without much effort with different type of authentication approaches such as cookie based authentication, bearer token authentication, etc. ASP.NET Core is a no exception to this and it got even better (which we will see in a while).
However, handling this in a load balanced environment has always involved extra caring as all of the nodes should be able to read the valid authentication token even if that token has been written by another node. Old-school ASP.NET solution to this is to keep the Machine Key in sync with all the nodes. Machine key, for those who are not familiar with it, is used to encrypt and decrypt the authentication tokens under ASP.NET and each machine by default has its own unique one. However, you can override this and put your own one in place per application through a setting inside the Web.config file. This approach had its own problems and with ASP.NET Core, all data protection APIs have been revamped which cleared a room for big improvements in this area such as key expiration and rolling, key encryption at rest, etc. One of those improvements is the ability to store keys in different storage systems, which is what I am going to touch on in this post.
The Problem
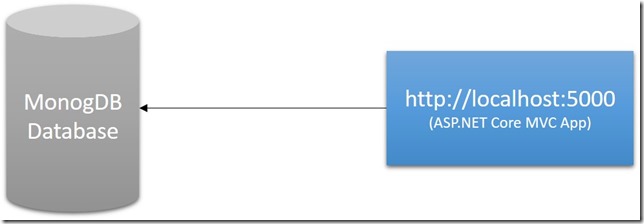
Imagine a case where we have an ASP.NET Core application which uses cookie based authentication and stores their user data in MongoDB, which has been implemented using ASP.NET Core Identity and its MongoDB provider.
This setup is all fine and our application should function perfectly. However, if we put this application behind HAProxy and scale it up to two nodes, we will start seeing problems like below:
System.Security.Cryptography.CryptographicException: The key {3470d9c3-e59d-4cd8-8668-56ba709e759d} was not found in the key ring.
   at Microsoft.AspNetCore.DataProtection.KeyManagement.KeyRingBasedDataProtector.UnprotectCore(Byte[] protectedData, Boolean allowOperationsOnRevokedKeys, UnprotectStatus& status)
   at Microsoft.AspNetCore.DataProtection.KeyManagement.KeyRingBasedDataProtector.DangerousUnprotect(Byte[] protectedData, Boolean ignoreRevocationErrors, Boolean& requiresMigration, Boolean& wasRevoked)
   at Microsoft.AspNetCore.DataProtection.KeyManagement.KeyRingBasedDataProtector.Unprotect(Byte[] protectedData)
   at Microsoft.AspNetCore.Antiforgery.Internal.DefaultAntiforgeryTokenSerializer.Deserialize(String serializedToken)
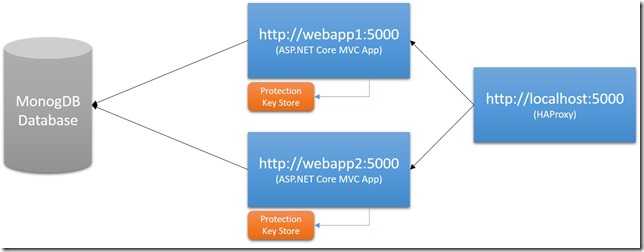
Let’s look at the below diagram to understand why we are having this problem:
By default, ASP.NET Core Data Protection is wired up to store its keys under the file system. If you have your application running under multiple nodes as shown in above diagram, each node will have its own keys to protect and unprotect the sensitive information like authentication cookie data. As you can guess, this behaviour is problematic with the above structure since one node cannot read the protected data which the other node protected.
The Solution
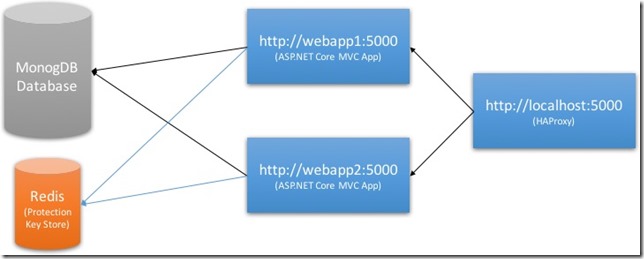
As I mentioned before, one of the extensibility points of ASP.NET Core Data Protection stack is the storage of the data protection keys. This place can be a central place where all the nodes of our web application can reach out to. Let’s look at the below diagram to understand what we mean by this:
Here, we have Redis as our Data Protection key storage. Redis is a good choice here as it’s a well-suited for key-value storage and that’s what we need. With this setup, it will be possible for both nodes of our application to read protected data regardless of which node has written it.
Wiring up Redis Data Protection Key Storage
With ASP.NET Core 1.0.0, we had to write the implementation by ourselves to make ASP.NET Core to store Data Protection keys on Redis but with 1.1.0 release, the team has simultaneously shipped a NuGet package which makes it really easy to wire this up: Microsoft.AspNetCore.DataProtection.Redis. This package easily allows us to swap the data protection storage destination to be Redis. We can do this while we are configuring services as part of ConfigureServices:
public void ConfigureServices(IServiceCollection services)
{
    // sad but a giant hack :(
    // https://github.com/StackExchange/StackExchange.Redis/issues/410#issuecomment-220829614
    var redisHost = Configuration.GetValue<string>("Redis:Host");
    var redisPort = Configuration.GetValue<int>("Redis:Port");
    var redisIpAddress = Dns.GetHostEntryAsync(redisHost).Result.AddressList.Last();
    var redis = ConnectionMultiplexer.Connect($"{redisIpAddress}:{redisPort}");

    services.AddDataProtection().PersistKeysToRedis(redis, "DataProtection-Keys");
    services.AddOptions();

    // ...
}
I have wired it up exactly like this in my sample application in order to show you a working example. It’s an example taken from ASP.NET Identity repository but slightly changed to make it work with MongoDB Identity store provider.
Note here that configuration values above are specific to my implementation and it doesn’t have to be that way. See these lines inside my Docker Compose file and these inside my Startup class to understand how it’s being passed and hooked up.
The sample application can be run on Docker through Docker Compose and it will get a few things up and running:
- Two nodes of the application
- A MongoDB instance
- A Redis instance
You can see my docker-compose.yml file to understand how I hooked things together:
mongo:
    build: .
    dockerfile: mongo.dockerfile
    container_name: haproxy_redis_auth_mongodb
    ports:
      - "27017:27017"

redis:
    build: .
    dockerfile: redis.dockerfile
    container_name: haproxy_redis_auth_redis
    ports:
      - "6379:6379"

webapp1:
    build: .
    dockerfile: app.dockerfile
    container_name: haproxy_redis_auth_webapp1
    environment:
      - ASPNETCORE_ENVIRONMENT=Development
      - ASPNETCORE_server.urls=http://0.0.0.0:6000
      - WebApp_MongoDb__ConnectionString=mongodb://mongo:27017
      - WebApp_Redis__Host=redis
      - WebApp_Redis__Port=6379
    links:
      - mongo
      - redis

webapp2:
    build: .
    dockerfile: app.dockerfile
    container_name: haproxy_redis_auth_webapp2
    environment:
      - ASPNETCORE_ENVIRONMENT=Development
      - ASPNETCORE_server.urls=http://0.0.0.0:6000
      - WebApp_MongoDb__ConnectionString=mongodb://mongo:27017
      - WebApp_Redis__Host=redis
      - WebApp_Redis__Port=6379
    links:
      - mongo
      - redis

app_lb:
    build: .
    dockerfile: haproxy.dockerfile
    container_name: app_lb
    ports:
      - "5000:80"
    links:
      - webapp1
      - webapp2
HAProxy is also configured to balance the load between two application nodes as you can see inside the haproxy.cfg file, which we copy under the relevant path inside our dockerfile:
global
  log 127.0.0.1 local0
  log 127.0.0.1 local1 notice

defaults
  log global
  mode http
  option httplog
  option dontlognull
  timeout connect 5000
  timeout client 10000
  timeout server 10000

frontend balancer
  bind 0.0.0.0:80
  mode http
  default_backend app_nodes

backend app_nodes
  mode http
  balance roundrobin
  option forwardfor
  http-request set-header X-Forwarded-Port %[dst_port]
  http-request set-header Connection keep-alive
  http-request add-header X-Forwarded-Proto https if { ssl_fc }
  option httpchk GET / HTTP/1.1\r\nHost:localhost
  server webapp1 webapp1:6000 check
  server webapp2 webapp2:6000 check
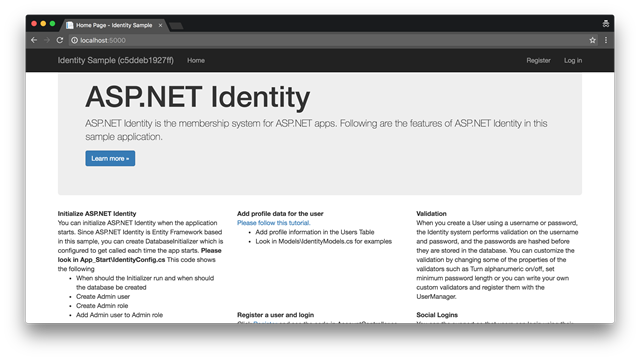
All of these are some details on how I wired up the sample to work. If we now look closely at the header of the web page, you should see the server name written inside the parenthesis. If you refresh enough, you will see that part alternating between two server names:
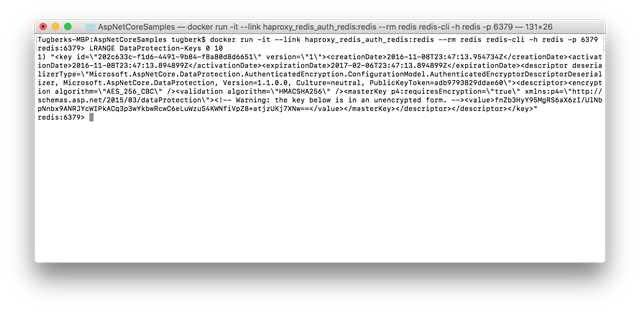
This confirms that our load is balanced between the two application nodes. The rest of the demo is actually very boring. It should just work as you expect it to work. Go to “Register” page and register for an account, log out and log back in. All of those interactions should just work. If we look inside the Redis instance, we should also see that Data Protection key has been written there:
docker run -it --link haproxy_redis_auth_redis:redis --rm redis redis-cli -h redis -p 6379
LRANGE DataProtection-Keys 0 10
Conclusion and Going Further
I believe that I was able to show you what you need to care about in terms of authentication when you scale our your application nodes to multiple servers. However, do not take my sample as is and apply to your production application :) There are a few important things that suck on my sample, like the fact that my application nodes talk to Redis in an unencrypted fashion. You may want to consider exposing Redis over a proxy which supports encryption.
The other important bit with my implementation is that all of the nodes of my application act as Data Protection key generators. Even if I haven’t seen much problems with this in practice so far, you may want to restrict only one node to be responsible for key generation. You can achieve this by calling DisableAutomaticKeyGeneration like below during the configuration stage on your secondary nodes:
public void ConfigureServices(IServiceCollection services)
{
     services.AddDataProtection().DisableAutomaticKeyGeneration();
}
I would suggest determining whether a node is primary or not through a configuration value so that you can override this through an environment variable for example.
