Cleaning up With PowerShell After Removing a Windows Azure Virtual Machine
Removing a Windows Azure Virtual Machine doesn't remove everything for you. This post is all about cleaning up with PowerShell after removing a Windows Azure VM
28 April 2013
4 minutes read
Related Posts


When you remove a Windows Azure virtual machine, you are not actually removing everything. I hear you saying "What!!!"? Let's dive in then ![]()
As each VM is kept under a cloud service, that cloud service is one of those things that remain after you remove your VM. Other thing is the disk (or disks, depends on your case) which is attached to your VM. If you didn't attach any data disks, at least your OS disk will remain inside your storage account even if you remove your VM. However, you cannot go and directly delete that VHD file just like a typical blob because there is a lease on that blob as it's still viewed as one of your registered disks.
Let's look at a case of mine on removing a Windows Azure VM. Yesterday, I created two VMs for demonstration purposes on a presentation and after the presentation, I removed those VMs by running "Remove-AzureVM" PowerShell command. So far, so good. When I go to the portal, I don't see those VMs as expected and I don't see any cloud services.
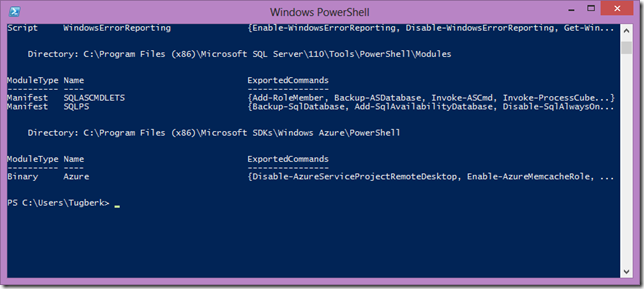
If you create a VM, the new portal is not showing that you have a cloud service but it implicitly creates one for you under the covers. As soon as you attach another VM to that cloud service, the cloud service shows up on the new portal as well. In either of these cases, the generated cloud service is completely visible to you through the REST management API. So, you can view them through PowerShell Cmdlets.
Let's run "Get-AzureService" PowerShell command to see my cloud services:

These are the generated cloud services which belong to my removed VMs. As far as I know, these cloud services won't cost me anything as they contain no deployments but it would be nice to remove them as I don't need them.

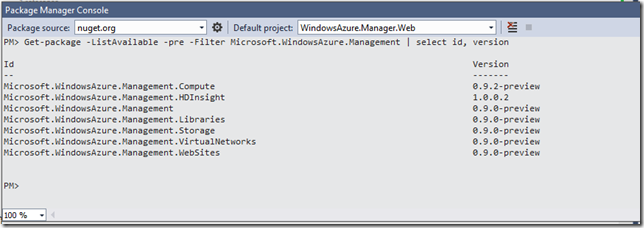
I got rid of the unnecessary cloud services. The next and final step of this cleaning is to remove the OS disks I have. This's actually more important because disk VHD files are stored inside the Windows Azure storage as blobs and each OS disk is approx. 127GB in size. So, I will pay for them as long as I keep them. Through new Windows Azure Storage PowerShell Cmdlets, I can view my VHD container to see which VHD files I have:

As you can see, I have two unnecessary VHD files which remained after my VM removal. At this stage, you might think directly deleting these blobs but as mentioned before, it will fail if we try to do that.

The error message I got is very descriptive actually: There is currently a lease on the blob and no lease ID was specified in the request. Let's run another PowerShell command to see which disks I have registered:
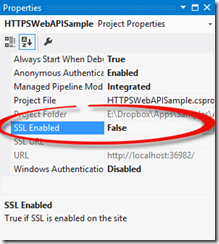
I have those two blobs registered as my disks and this prevents me from directly deleting them which is perfectly reasonable. To prove that this is actually the case, I will view the HTTP headers of one of those disks through CloudBerry Explorer for Azure Blob Storage:

You can see that "x-ms-lease-status" header is set to "locked" which states that there is a lease on the blob. Let's remove the "IstBootcampDemoTugberk-IstBootcampVM1-2013-4-27-132" disk from my registered disks:

Now, let's look at the HTTP headers of the blob again:

The lease is now taken out and it's now possible to delete the blob:
However, you can delete the disk from your registered disks list and the storage container in one go by running "Remove-AzureDisk" PowerShell Cmdlet with "DeleteVHD" switch:

The VHD file is completely gone. I hope the post was helpful ![]()

Hey, I'm Tugberk 👋
Coder 👨🏻💻, Speaker 🗣, Author 📚, ex-Microsoft MVP 🕸, Blogger 💻
I live in London, UK 🏡
