Playing Around with Docker: Hello World, Development Environment and Your Application
I have been also looking into Docker for a while now. In this post, I am planning to cover what made me love Docker and where it shines for me.
13 July 2015
7 minutes read
Related Posts

When you have a urge to blog about something, it's mostly the case that you have just learnt something :) Well, it's the case for me now. I have been looking into Linux space for a while now and I didn't expect it to go this smooth. It is wonderful and I must admit that I have been missing on too many nice stuff by sticking with Windows for my development environment. However, I have one thing, one big thing that I have no regret at all: .NET ecosystem. It's one of the great ecosystems to write application on top and as it's now so easy to get it into non-Windows environments, the entry door for those environments are now wide open to me.
I have been also looking into Docker for a while now and I was mostly trying to understand the concept as it's so distant to you if you were only developing on Windows for long time. After the concept was clear, the fun part started to take place. In this post, I am planning to cover that part and show you what made me love Docker.
Why Docker
Here is why I think Docker is useful for me (not much different than the other people's reasons):
- Repeatable, declarative environments. This can get much better with Docker compose for your development, CI, QA (a.k.a. your Pre-Production) environments.
- Read, try and tear down when you are learning a new tool like Redis, RabbitMQ, etc. Just run the docker run command and create the container. Play with the tools on that container and remove the container at the end.
- One way of deploying stuff. AWS, Azure, whatever. Wherever you go, you will use the same script to deploy your stuff.
- Shifting your thinking to modularize the hell out of your solution (microservices, there I said it). This can open up insane opportunities. For example, developing each part of your application with the stack that is suitable for the job. Not only you will preserve your sanity by using the right tool but also you will have different parts inside your solution which can be developed separately by separate people who has different skill sets. I strongly suggest the .NET Rocks podcast on Building Microservices with Howard Dierking to understand more about this.
- I am not sure about this but Docker also makes it really trivial for people to dockerize repro environments for issues.
There will be possibly more by these are the stuff that made me love Docker.
Hello World
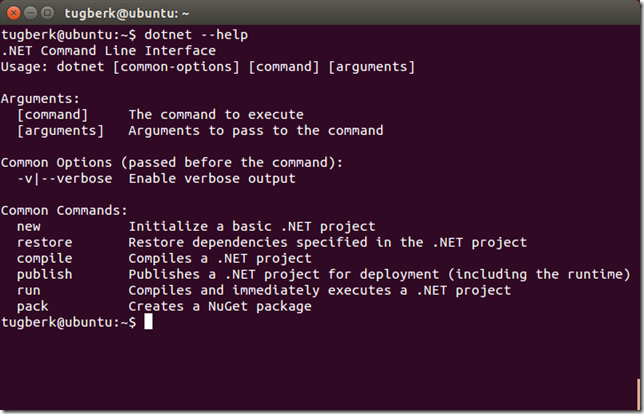
I will assume that you installed Docker and you are ready to go. In my case here, I am using Ubuntu 14.04 LTS but I assume it should be the same on OS X as well.
As you can expect from Docker, the "Hello World" example is also declared and packaged up (A.K.A. dockerized). To get the "Hello World" example running, just run the below command:
docker run ubuntu:14.04 /bin/echo 'Hello world'
What happens when you do this is explained under Docker Hello World docs but briefly, you have a container based on Ubuntu 14.04 image and ran echo 'Hello World' in it and exited.

As mentioned, this container will not live after the echo is finished its job but it is still there to run. If you run the below command, you will see that container is there:
docker ps -a
We start the container by running the following command based on the container ID we retrieved from the docker ps output:
docker start --attach 6a174ac370a2
We also used --attach switch here to attach STDOUT/STDERR and forward signals and that's why we are able to see the hello world written in our console. Let's see a more realistic container example this time by getting an alive container up:
docker run -d ubuntu:14.04 /bin/sh -c "while true; do echo hello world; sleep 1; done"
This example is the exact same example you can find on "A daemonized Hello world" section of Docker Hello World doc. The interesting stuff here is the -d switch which tells Docker to run the container and put it in the background. If we run docker ps now, we should see that the container is still at the running state:

We can attach to a running container's STDOUT/STDERR by running the below command based on the container ID:
docker attach ff2847155ced

You can detach from the container and leave it running with CTRL-p CTRL-q.
Also, you should have noticed that the first run command we have run took a while to get it up because it downloaded all the images from the registry. However, the second one was instantaneous as Ubuntu 14.04 was already there. So, we can understand from here that Docker images are immutable and composable which is great. You can look at the images you have under your host by running docker images command.

Development Environment
As mentioned before, Docker makes it super easy to get stuff in and try them out. For example, Redis is on Docker registry and I can just run it as another container:
docker run --name my-redis -d redis:3.0.2


I am seeing here that the TCP port 6379 is also exposed which is the port that Redis is exposed. However, I need to know the IP address of this host to connect to this Redis instance from the host. We can figure out the IP address of a running container through the inspect command:
docker inspect --format '{{ .NetworkSettings.IPAddress }}' dfaf0cf33467
Now, I can connect to this Redis instance with redis-cli tool I have installed in my host:
redis-cli -h 172.17.0.10 -p 6379

I can play with this as long as I want and I can stop the container whenever I don't need it anymore. I can follow this process for nearly everything (e.g. Ruby, GoLang, Elasticsearch, MongoDB, RabbitMQ, you-name-your-thing, etc.). For example, get yourself a python development environment, you can run the following docker run command:
docker run -t -i python:2.7.10 /bin/bash
This will get you an interactive container with Python installed in it and you can do anything you want with it:

When you’re done you can use the exit command or enter Ctrl-D to finish your interactive session inside the container and effectively stop the container. This container is still in your easy reach. You can start it again by obtaining its ID by running docker ps -a and running the start command with the container ID.
You might wonder how tools like Redis, MongoDB and Elasticsearch fit into this world as they need to persist data on disk but Docker containers in nature are created and torn down without any worry. This is a well-thought problem and Docker has a solution for this problem with Data Volumes.
Your Application
This is all great and shiny but where does our application fit into this? There are some many different approaches that you can take with Docker for your application but let me show you a straight from and a powerful approach which will possibly give you an idea.
For an application example, I have chosen to dockerize Octopus Deploy Library web application which works on top of Node.js. The way to achieve this is through the Dockerfile. It has a well written documentation and here is how the Dockerfile for Octopus Deploy library would look like:
FROM node:0.12.7

RUN ["npm", "install", "gulp", "-g"]
RUN ["npm", "install", "bower", "-g"]
RUN ["npm", "install", "grunt-cli", "-g"]

COPY . /app
WORKDIR /app

RUN ["npm", "install"]
RUN ["bower", "--allow-root", "install"]

EXPOSE 4000

ENTRYPOINT ["gulp"]
In my opinion, self-descriptiveness is the the best part of this file. We are defining here that the application image should be based on node:0.12.7 image, which has node.js stuff in it. Then, we run a few npm commands to install what we need. Later, we copy our stuff and change the working directory. Lastly, we install dependencies, expose the TCP port 4000 and specify the entry point command.
Octopus Deploy does its magic and gets the server up when you run gulp default task. That's why it's our entry point here.
We can now build our application image:
docker build -t octopus-library .

This kicks off the build and creates the image if everything goes well. Lastly, we can get the container up and running under our host using the same run command:
docker run -t -d -p 4040:4000 octopus-library
We use -p option here to map the internal 4000 TCP port to 4040 TCP port of the host. With this way, you can access the running application from the host through 4040 TCP port:

You can repeat the same steps by cloning my fork of Octopus Library and switching to docker branch.
Resources

Hey, I'm Tugberk 👋
Coder 👨🏻💻, Speaker 🗣, Author 📚, ex-Microsoft MVP 🕸, Blogger 💻
I live in London, UK 🏡
